Setting up my personal Cloud
What and why ?
How to store my data is one of the main issues of my numerical life. I actually face several issues:
- How to share my data with other people easily?
- How to avoid losing everything when a hard drive dies?
- How to access my data from several devices?
- How to avoid filling the whole memory of my computer with my pictures?
- How to ensure data privacy ?
One of the options is to store my data on a distant cloud server. Several online platforms are available, like the ones of the usual big companies:
- Google Drive
- Microsoft OneDrive
- iCloud (Apple)
- Amazon
But my main issue with these is data privacy. It is now well-known that these companies read the content of our data to do targeted advertisment, sell some of them to third parties, or even claim their ownership. Servers are often in a different country and do not have to respect the laws of yours. Another issue of course is the price, increasing rapidly with the data size.
Some other suppliers exist, more respectful of data privacy, like Cosy which stores data in France and makes its privacy policy a strength. But again price can increase a lot.
Therefore, I decided to create my own cloud server at home. That solves the issue of data privacy (as long as my local network is secured), and the issue of price (in long term because an initial investment is necessary). And, most of all… it’s fun ! However this solution is weak against fires and robbers, that is why redundancy in a different location would be necessary to make an even safer system, but this is not in the scope of this guide.
Let’s see what I did !
Overview
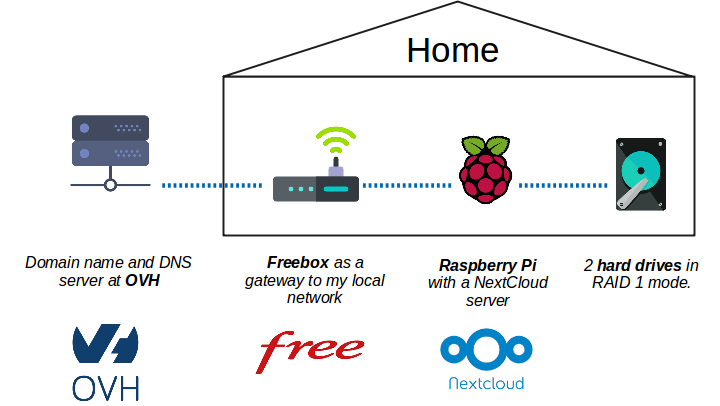
Here is a picture to summarize my setup. Every part of it is detailed in the next parts.
Now if I want to access my cloud from anywhere in the world I access https://cloud.taprest.fr
to reach the web interface of NextCloud (protected by login/password):

Step 1: The hardware
Here is all the hardware I used:
- Icy Box IB-RD3620SU3
This is a hard drive container which allows to manage two disks in RAID (including RAID 1). It is possible to communicate with the hard drives in USB or SATA.
I bought this on materiel.net for 80€. The package includes the USB cable and the power cable. - 2x Seagate BarraCuda 4 To
Two hard drives of 4 TerraBytes each to insert in the container above. My data are stored in these hard drives.
I bought this on materiel.net for 110€ each. - Raspberry Pi 3 B+
A mini-computer to run the cloud server and read/write on the disks.
I bought this on Amazon for 37€ as long as a the official charger for 13€. - Freebox mini
My Internet service provider is free and provides me with a router (also doing modem). This is what I use to connect my local network to the outside world.
Total price: about 340€
This does not include a case for the Raspberry Pi that I did not buy because I printed it with my 3D printer, and
a micro SD card that I already had.
Step 2: the hard drive container
The Icy Box is very simple to use. I just inserted both of my hard drive in it and turned it on. Afterwards, I use the buttons of the case to select RAID 1 mode. This means that the set of 2 disks is seen as a single disk of 4 TB, each disk being the mirror of the other. This is a redundancy which prevents to lose all data if a disk dies. To know more about RAID, read the Wikipedia page.
The disks are not formatted and are not usable yet. To format them, I connected the Icy Box to a Linux computer with the USB cable. Using the disk manager I formatted them in ext4 format. I chose this format because this is the best if they are managed by a Linux system, and the Raspberry Pi runs on Linux.
Step 3: The RPI basic setup
I flashed the SD card with the last Raspbian release. On Windows, I used Etcher to write the image on the card. On Linux, it can be done with a few command lines like it is explained here.
To connect to my RPI the first time, I needed to enable SSH. To do so I created a file named ssh in the /boot
partiton of the SD card. Then I started the RPI with this card. I connected it to my router with an ethernet cable,
and looked for its address on the Freebox web interface in the DHCP menu.
Using a standard console on Linux or Putty on Windows, I opened a ssh session on the RPI,
default login and password being pi and raspberry.
Then comes the configuration with the command raspi-config:
- To connect the RPI to my WiFi network,
because I can’t let it near the router (I don’t have much space) but if you can, just let the ethernet cable it will be much better ! The RPI 3 B+ has an integrated Wifi antenna and does not need an external dongle, which is great ! - To change user password
Please select a strong password ! - Expand the file system
If the file system does not use the whole SD card yet.
Then of course the system needed to be upgraded:
sudo apt-get update
sudo apt-get upgrade
Nextcloud requires Apache and Php to be installed.
Finally, I checked that my hard drives were visible and correctly mounted. I connected the RPI to the Icy Box
and checked the presence of the mounted device in /media/pi/.
Troubles
I wanted the last version of php but as it was not in the
official packages of Debian Stretch, I had to do the following manipulations:
- Add
deb https://packages.sury.org/php/ stretch mainto/etc/apt/sources.list.d/php7.list - Update again with
apt-get update - Install the desired version:
sudo apt-get install php7.3
Also, the following php modules had to be installed:
php7.3-cli php7.3-mysql php7.3-sqlite3 php7.3-xml php7.3-zip php7.3-mbstring php7.3-gd php7.3-curl
And in case the PHP module is not enabled by default, this is how to enable it:
a2enmod php7.3
Step 4: NextCloud
First, I downloaded the last release of NextCloud in the html directory:
cd /var/www/html
curl https://download.nextcloud.com/server/releases/nextcloud-15.0.0.tar.bz2 | sudo tar -jxv
For the initialization of NextCloud. I created a data folder in the directory of NextCloud:
sudo mkdir /var/www/html/nextcloud/data
Then the user and group used by Apache required ownership and rights on the NextCloud directory:
sudo chown -R www-data:www-data /var/www/html/nextcloud/
sudo chmod 750 /var/www/html/nextcloud/data
From there, NextCloud was ready to be run. To do so I just opened my browser on <my_RPI_IP>/nextcloud.
The first screen invited me to create an admin account, where I chose a strong password.
This was a good time to explore the interface before going further. But of course it was too soon to
upload all my data.
Moving Nextcloud’s data folder.
In the previous part Nextcloud was configured to store data in /var/www/html/nextcloud/data.
But I wanted data to be on the external hard drive. To do so, I simply moved the data folder to
my external drive:
mv -v /var/www/html/nextcloud/data /media/internal/pi/my_drive/nextcloud-data
And configured Nextcloud to use this directory by editing the configuration file:
sudo nano /var/www/html/nextcloud/config/config.php
…and modifying the attribute datadirectory:
'datadirectory' => '/media/internal/pi/my_drive/nextcloud-data',
I saved and quitted out of the file by pressing Ctrl+X then Y and then Enter.
The final step was to change permissions on the external drive directory to allow Nextcloud to access it:
sudo chmod o+rx /media
sudo chmod o+rx /media/internal
sudo chmod o+rx /media/internal/pi
sudo chmod o+rx /media/internal/pi/my_drive
Refreshing the browser showed me no difference on the interface, proof that everything worked well.
Increasing Nextcloud’s max upload size
By default, PHP has a very low upload limit, it’s only 2 MB. To change this, I needed to modify the php.ini file and increase the limit.
sudo nano /etc/php/7.0/apache2/php.ini
And in the file:
post_max_size = 1G
upload_max_filesize = 1G
But of course any other value can be written. Apache had to be restarted again after this operation:
sudo service apache2 restart
Allowing the .htaccess override
Next, I needed to deal with the .htaccess file for Nextcloud. Since I installed Nextcloud into the default Apache2 directory /var/www/html, I needed to change some settings in Apache2 to allow the .htaccess file to override settings.
sudo nano /etc/apache2/apache2.conf
And I changed this:
<Directory /var/www/>
    Options Indexes FollowSymLinks
    AllowOverride None
    Require all granted
</Directory>
To this:
<Directory /var/www/>
    Options Indexes FollowSymLinks
    AllowOverride All
    Require all granted
</Directory>
And once more, I restarted Apache:
sudo service apache2 restart
Nextcloud optimizations
Nextcloud can be speed up by configuring various things in the web server. This page of the documentation explains the details of the tunings. Also, the administration page in the web interface of Nextcloud performs an auto-check and lists what can be improved. This is very useful information!
Step 5: Connect the Pi to the outside world
Prepare Nextcloud for external access
By default, Nextclouds allowed connections made with the local IP address of the RPI (the address I used
during the initialization). But I wanted to access this server from the outside world as well, using a
custom address with my domain name: cloud.taprest.fr. I had to modify the configuration file of Nextcloud
to add my domain name:
sudo nano /var/www/html/nextcloud/config/config.php
…to obtain these lines:
'trusted_domains' =>
array (
    0 => '<my_RPI_local_IP>',
    1 => 'cloud.taprest.fr',
),
Secure the Raspberry Pi
In order to ban sources spamming my ports or trying to brute-force my authentication, I installed
fail2ban. To activate the jails for ssh and apache services,
I created the file /etc/fail2ban/jail.d/custom.conf with the following lines in it:
[sshd]
enabled = true

[apache-auth]
enabled = true

[apache-badbots]
enabled = true

[apache-noscript]
enabled = true

[apache-overflows]
enabled = true

[apache-nohome]
enabled = true

[apache-botsearch]
enabled = true

[apache-fakegooglebot]
enabled = true

[apache-modsecurity]
enabled = true

[apache-shellshock]
enabled = true
And I restarted fail2ban:
sudo systemctl restart fail2ban
Port redirection
To make the RPI accessible from outside my home, I redirected ports 80 (http) and 443 (https) of my Freebox to the same ports on the RPI. To do so I had a menu “port redirection” in the configuration page of my router (the Freebox).
Now if I tried to access <my.public.IP.adress>/nextcloud in the web bowser, I reached the Nexcloud server.
Step 6: Redirect domain name to the server
One could ask his ISP to get a static IP adress, but in my case Free offers a nice service (for free): it can give me a static domain name always pointing at my Freebox, even if its IP adress is changing, This feature can activated from the Freebox administration interface.
I rent my domain name taprest.fr to OVH for less than 10€ each month. The client interface allows me to
create as many sub-domains as I want, and redirect them to the target I want.
This OVH guide
explains the details of redirection. What I did is redirecting cloud.taprest.fr to the static domain name
pointing at my Freebox. The redirection is of type CNAME.
Then, to access my Nextcloud server, I could simply go to cloud.taprest.fr/nextcloud.
Step 7: Secure the connection with a SSL certificate
In order to connect to my server using HTTPS without having a warning message in my browser, and to ensure the security of my connection, I chose to get a certicate from the certificate authority Let’s Encrypt which is completely free ! To learn more about it, visit the official website.

Concretely, to deploy the certificate on my server, I used certbot: a tool made to easily and quickly deploy Let’s Encrypt certificates. The website of certbot contains all the detailed instructions, but here is what I did basically:
- First, install certbot:
sudo apt-get install python-certbot-apache -t stretch-backports - Then, get the certificate and edit the Apache configuration to serve it:
sudo certbot --apacheThis command asked me some information like the domain name for the certificate, which is
cloud.taprest.fr.
And that’s all ! My server was now available at https://cloud.taprest.fr/nextcloud with a valid certificate.

Step 8: avoid /nextcloud in the URL
So far I had to type /nextcloud in the URL because Nextcloud is in a subdirectory of /var/www/html.
This was annoying and I wanted to type cloud.taprest.fr to get to the Nextcloud interface.
To do so, I used the Apache feature of virtual hosts. Certbot already created some configuration files, so I simply modified them.
In /etc/apache2/sites-enabled/000-default.conf, I have the following lines:
<VirtualHost *:80>
    ServerAdmin webmaster@localhost
    DocumentRoot /var/www/html/nextcloud
    ServerName cloud.taprest.fr
    ErrorLog ${APACHE_LOG_DIR}/error.log
    CustomLog ${APACHE_LOG_DIR}/access.log combined

    RewriteEngine on
    RewriteCond %{SERVER_NAME} =cloud.taprest.fr
    RewriteRule ^ https://%{SERVER_NAME}%{REQUEST_URI} [END,NE,R=permanent]
</VirtualHost>
The important lines are:
DocumentRoot /var/www/html/nextcloud
ServerName cloud.taprest.fr
And this the same principle for /etc/apache2/sites-enabled/000-default-le-ssl.conf:
<VirtualHost *:443>
    ServerAdmin webmaster@localhost
    DocumentRoot /var/www/html/nextcloud

    ErrorLog ${APACHE_LOG_DIR}/error.log
    CustomLog ${APACHE_LOG_DIR}/access.log combined

    ServerName cloud.taprest.fr
    SSLCertificateFile /etc/letsencrypt/live/cloud.taprest.fr/fullchain.pem
    SSLCertificateKeyFile /etc/letsencrypt/live/cloud.taprest.fr/privkey.pem
    Include /etc/letsencrypt/options-ssl-apache.conf
</VirtualHost>
Now, cloud.taprest.fr will directly point at the nextcloud subdirectory, and i do not
need to type /nextcloud anymore.